
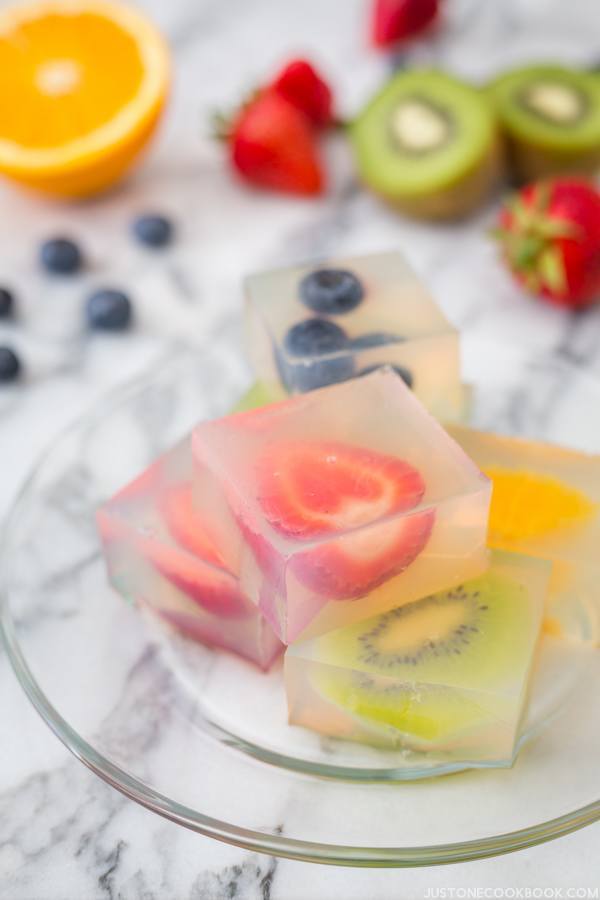
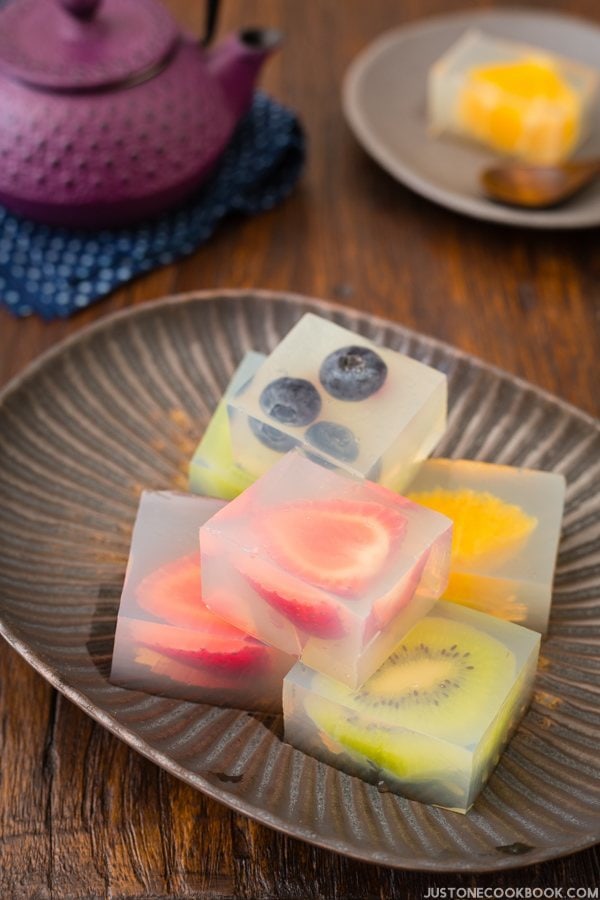
On a hot summer days, what are your favorite sweets to enjoy and cool down? One of my favorite is this see-through fruit jelly. The see-through jelly reminds me of ice cubes and it makes me feel cool instantly, as I imagine the chilled jelly with refreshing fruits in my mouth.
This quick and easy dessert recipe has been in my mind to share for quite a while, and now is the perfect time as I am still kitchen-less. Based on the latest estimate I might have a functional kitchen in 2 weeks… I just can’t wait.
Easy Fruit Jelly Recipe
So I want to emphasize it’s super easy to make this attractive dessert. All you need is a portable stove, a small saucepan, a cutting board, a knife and a mold. If you are wondering how I created this recipe, it was created in my upstairs office which is now also a kitchen/dining room.
Ingredients and Equipment for Fruit Jelly
Kanten (agar) – vegetarian & vegan-friendly jelly
This jelly is made with kanten (agar) powder. In case you’re not familiar, kanten (寒天) or agar is a white and semi-translucent gelatinous substance, obtained from algae. Just like gelatin, it solidifies liquid.
However, kanten (agar) is vegetarian and vegan-friendly, and it’s a great alternative to animal or chemical-based gelatin.
If you want to know more about kanten (agar), please read my Agar/Kanten Page.
Nagashikan – mold with removable inner tray

For this recipe, I actually bought a traditional Japanese stainless steel mold with a removable inner tray called Nagashikan (流し缶).
This removable inner tray makes it easy for you to un-mold the food, especially if the food easily sticks to the container.

We use nagashikan to make Tamago Tofu (玉子豆腐) and traditional cold treats like Yokan (羊羹, azuki bean jelly).
But no worries, if you don’t have this (or didn’t win my giveaway – details below), you can simply use a mold or baking pan with higher rim and place a plastic wrap on bottom of the mold so you can un-mold easily. You can purchase the mold from here (where I got) or here.
Another option is to chop all the fruits in small cubes and serve this dessert in an individual glass cups. I usually make my fruit jelly that way and they look really pretty in a glass container.
If you decide to serve this jelly in individual cups, reduce the amount of kanten (agar) powder to 2 grams. That way, the jelly is softer and jiggly. Today’s recipe requires us to cut around the fruits, so the jelly is designed to set firmer and it won’t jiggle as much. More explanation on this in the next section.
Tips before start making
Texture of the jelly:
If you prefer softer jelly texture that are not firm like my fruit jelly today, you can reduce the amount of kanten (agar) powder to 2 grams (half the package).
If you do so, I highly recommend to chop fruits into smaller cubes, make the jelly in individual cups or a large baking pan and serve with a spoon.
Less kanten powder will result in jelly that would jiggle (プルプルって感じ) and it will go through your throat smoothly. If you prefer to make this “ice cube” style, keep the ratio as it is.
Choice of fruits:
Besides the fruits I used for this recipe, you can use peaches, apples, and other types of berries. Also, canned mandarin oranges and peaches are great choices as well and the syrup adds additional sweetness. I recommend an assortment of colorful fruits that would look pretty suspended in jelly.
Sugar:
I use 4 Tbsp. (1/4 cup) of sugar for this recipe. To call this dish “dessert”, 4 Tbsp. of sugar is absolutely necessary and it’s on the healthier side.
If you want to omit sugar or use less, the fruits you use have to be super sweet or canned fruits in syrup. So, 4 Tbsp. for healthier jelly, and 6-8 Tbsp. for “dessert” fruit jelly. Please adjust the sugar amount to your liking.
Kanten (agar) powder:
There are 4 types of kanten/agar (powder, stick, thread, and flakes) and you can use any one of them. I used kanten powder for this recipe.
Kanten/agar can be found in your local Japanese (or Asian) grocery stores, and you can also purchase online at Mitsuwa or Marukai (for US residents).
For conversion from 2 tsp. (4 g) kanten powder, you will need:
- Agar/Kanten stick = 1 stick (8 g)
- Kanten thread = 24 threads (8 g)
- Agar flakes = 2 Tbsp. (8 g)
If you want to use gelatin instead, you will need 4 tsp. powder gelatin (8 g). Please remember the jelly made with gelatin will easily melt in the summer time while kanten (agar) will not melt at room temperature (read more here).
If you have any question about kanten/agar, please read this post first.
Worldwide Giveaway!

I’m giving away one (1) Nagashikan to Just One Cookbook newsletter subscribers. Please click here to enter for your chance to win! This contest is worldwide (everyone can enter)!
Don’t want to miss a recipe? Sign up for the FREE Just One Cookbook newsletter delivered to your inbox! And stay in touch on Facebook, Google+, Pinterest, and Instagram for all the latest updates.

- 2 cups (500 ml) water
- 0.14 oz (4 g) kanten powder (1 package)
- ¼ cup (4 Tbsp.) sugar (4 Tbsp. for "healthy" and 6-8 Tbsp. for "dessert". Pls read the post.)
- Fruits of your choice (orange, strawberries, blueberries, kiwi)
- A nagashikan (read the post) or mold (6 x 5 x 2 inch or 15 x 13.5 x 4.5 cm)


- In a small saucepan, add 2 cups (500 ml) of water and 4 gram kanten powder. Whisk to combine and bring it to a boil.

- Once boiling, lower the heat and cook for 2 minutes. Whisk occasionally and make sure kanten powder has completely dissolved. After 2 minutes, remove from the heat.

- Add ¼ cup (4 Tbsp.) sugar and whisk till sugar is completely dissolved.

- Run water in the mold (or nagashikan) and pour the liquid until there is about ⅓ inch (1 cm) in the mold (so that fruits won't touch the bottom). Using a spoon or toothpick, move the bubbles on the liquid to the corner and remove them. Transfer the mold to the refrigerator and wait till solidify, about 10 minutes (it will solidify at room temperature, but it'll take a longer time depending on room temperature). The liquid in the saucepan should not be solidified as fast since the saucepan is still warm and it has more liquid in there. If solidify, then re-heat till it turns to liquid.

- Meanwhile cut fruits for the jelly.


- Once the ⅓ inch (1 cm) jelly has settled (Tilt the mold to see if it moves), place the fruits on top.

- Then pour the rest of the mixture and pop/remove the bubbles. Keep in the fridge until the jelly has solidified completely.

- Once solidified, run a knife around the mold and gently flip and unmold the jelly. If you’re using the nagashikan, run a knife around the mold and pull up the handles.

- Cut the jelly to around the fruits so they look prettier. Serve chilled on a plate.


The post Fruit Jelly フルーツ寒天 appeared first on Just One Cookbook.


